It is my observation that there are three specific areas that must be addressed on 95% of the ladies I train – see what they are.
One of the hardest things to do in fitness is generalize your workouts. In other words, each of us is so different form the next that it makes group fitness classes very difficult to design. How do you target the specific needs of each individual in the class and not make the session three hours long. For this reason, I always recommend a detailed evaluation of your specific limitations before designing any program, to see if it addresses all of your needs. And when ever possible, take one-on-one training so that the workout is customized towards meeting your specific needs and not the person next to you.
With that said, if I had to bite the bullet and create a workout to address the needs of one specific group, I think ladies would be the easiest to design. I say that because in my experience, women tend to have three specific areas that must be addressed on 95% of the ladies I train. Unfortunately, the reasons some of these areas need to be addressed is genetics.
All golfers want to hit their tee shots as far and as straight as they can. For many, this is where the most enjoyment playing the game is found. There’s nothing more satisfying than crushing a drive down the middle of the fairway. I encourage you then to be aware of the following five keys
when it comes to hitting your driver farther. Practice diligently and apply it effectively in order to increase your distance off the tee. It will make the game more fun and you will likely shoot lower scores. Good luck!
Fundamentals First
Sound set-up fundamentals (grip, stance, ball position, posture and alignment) is the foundation for developing the ideal distance-garnering combination – your maximum clubhead speed through impact along with a relatively square face angle. Understand and respect this. Do your utmost to ensure that you are in an orthodox starting position before you swing. Any errors here will likely manifest themselves by slowing you down and getting the clubface away from being square at the moment of truth – when you strike the ball.
Tilt your Spine to get Behind the Ball, the Reverse “K”
Tilt your spine into the Reverse “K” position. This positioning readies the body to create speed and encourages ideal club delivery possibilities. This is a classic long driver’s set-up.
Set up a Strong Triangle
Establish a preswing set up where a pronounced triangle is evident – positioning of arms and shoulders. The triangle is the strongest geometric shape. This position enables you to be as powerful and consistent as possible when striking golf shots.
Make the Shaft “Sing” through the Hitting Zone
Practicing by swinging your driver upside down – holding onto the shaft and swinging the grip without a ball present. You’re endeavouring to make
the shaft “sing,” creating as much shaft noise or “singing” through the hitting zone as possible. This provides immediate feedback on the amount of clubhead speed being generated as well as where the “singing” is happening relative to where the ball would be during the swing. Then turn your club into the normal position and try to make the shaft sing as intensely as you can through impact when hitting a ball. This drill is designed to create clubhead speed awareness and improvement. Try it. It works!
Finish in Balance, Let the Club Pull you all the way through
I encourage players to be able to stomp on an imaginary soft drink can underneath their back foot at the completion of their swing. Check yourself to see if you are finishing your swing all the way. Can you stomp on a can at the end of your swing?
The players who get it done in the wind are the ones who don’t try to fight it. They don’t swing harder or moan about bad luck. They focus on hitting the ball solidly, because a solid shot will fly true in a pretty stiff breeze, but a weak shot is hopeless.
Let’s focus on playing into the wind, because that’s the shot that gets most golfers. Obviously, you want to keep the ball low to neutralize the conditions. Best advice? Take a couple extra clubs, and swing at 75 percent. Fast swings create more backspin and send the ball higher, so resist the urge to smash it.
Play the ball an inch farther back than normal in your stance, and squat a little at address for stability. Then make a three-quarter swing, and try to stay more “on top of” the ball. Feel like your nose is ahead of the ball at impact, and your right hip and shoulder stay high through the strike. You’re hitting down on it, trapping it against the turf.
Last point: Wind in your face will exaggerate any curve. If you play a draw or fade, give the ball more room to turn. But don’t forget my big key: Take more club, and go easier.
If you have a hard time getting your tee shots up in the air, you’re giving up serious distance. I’ve got a tip that will help you: Check your stance width. I see so many amateurs who stand too narrow. They set their feet about as wide as their hips, head in line with the ball, shoulders level(below, right). That’s not a stable position, and usually sends the ball short and right.
Try this instead: Take your normal stance, then drop your right foot back a few inches, letting your head go with it. Your spine will tilt away from the target, with your shoulders angled upward(below, left). Now you’re in position to really launch the ball. In fact, you’ll hit it slightly on the upswing without changing anything in your swing. That’ll give you a higher trajectory and more carry distance.
The Deep stabilising muscles of the trunk form a muscular cylinder surrounding the lumbar spine and pelvis. The deep stabilisers help control the position and movement of the trunk. The mover muscles are more superficial, they are the muscles you use to move your body.
The Deep Stabiliser muscles:
Work at low intensity for long periods of time
Generate tension to support and stabilise rather than move the body
Contract before you move to support the body’s position
Turn on in a similar way no matter what way you are moving
Keep the spine and pelvis optimally aligned to maintain a neutral spine or ‘good posture’ position
The Mover muscles:
Work at high intensity for short periods of time
Generate force to move the body and change its position
Contract at the time of movement to cause the movement
Move the trunk and limbs
Work differently depending on what movement you are doing
The deep stabiliser muscles only work at about 5% of their maximal contraction, but stay on for long periods of time. As they contract, the stabilisers don’t move your body much, if at all. They tend to apply tension and support structures rather than move your body.
When you think of moving, the deep stabilisers contract before any of the muscles that actually cause the movement. This pre-contraction prepares your body for the movement by supporting and stabilising the trunk to provide a stable base for movement.
A stable base makes for mechanically efficient movement or static postures. Imagine a crane being positioned on a solid concrete slab versus a sandy beach. The crane on the concrete slab is much more easily controlled by the driver who can be more accurate as the crane picks up and sets down objects. The crane on the beach will be much less accurate and take more effort getting the objects placed exactly where it wants them. The deep stabilising muscles of the body provide the stable base for the mover muscles to move the trunk and limbs.
The mover muscles are the ones which move your body. The mover muscles generate a lot of force and fatigue quickly. They turn on and off rather than staying on like the stabiliser muscles. You can easily work your mover muscles by moving your body against resistance such as the quads, hamstrings or biceps. In the trunk the mover muscles include the rectus abdominis (the six pack) and the obliques. These are the muscles you work with exercises such as sit ups or crunches.
Poor Function
The Deep Stabiliser muscles:
Begin to turn off and on rather than staying on
Contract after you move and so can’t support the body’s position as effectively
Are less able to keep the spine and pelvis optimally aligned to maintain a neutral spine or ‘good posture’ position
The Mover muscles:
Work at high intensity for longer periods of time to compensate for poor deep stabiliser muscles
The deep stabilisers change the way they work when pain is present. They no longer contract before you move to prepare or stabilise the trunk, they react to the movement. This can lead to injury. The movement muscles try and compensate. As mover muscles, they contract strongly and start to move the body, other muscles then pull on to counteract this movement. The body is working much harder to stabilise and using much more muscle activity than it needs to. This results in tight areas of the body which feel great when massaged out, but the tightness returns again. If your back pain behaves this way chances are you have trouble controlling your deep stabilisers and the pain arises from the compensatory strategies of the mover muscles.
Screening
A number of screening tests can indicate poor control of the core. There are a couple of quick tests you can do at home. If any of these tests give you pain, do not continue any further testing and see an appropriate health professional.
The active straight leg raise
Lie on your back and lift one heel about 10cm off the ground with your knee straight. Compare how difficult this feels compared with the other side. If one side is harder than the other, or both sides are difficult, you could have some issues with control of your core.
As the downswing begins an amazing sequence of events takes place. The energy accumulated in your torso muscles gradually release, your upper body follow the lead established by your lower body unwinding as your weight continues to shift from your right side to your left.
Impact must be allowed to happen in a free, flowing movement. Letting it happen without interruption or compensations. Rotating forward allowing your body and arms to swing through to the finish will deliver the club face square to the path without manipulation. As you follow through getting the rights side of the body out of the way your weight should be now more in your front foot with great balance.
With the mechanics comes tempo and timing. These two aspects introduce coordination, flow and consistency into every swing. Good timing refers to the order in which the mechanics occur and tempo is the speed at which the swing occurs. Building the proper sequence throughout the swing allows the entire movement to flow together. Controlling the tempo allows time to prepare for impact, deliver the club, and then disperse the energy of the swing during the follow-through.
Knowing the information is not the secret, committing to change and developing your skills using a variety of drills and exercises is the key. Not only will make it enjoyable to train and practice you will start to see improvements more quickly when you are practicing with purpose. Training aspects of your swing will develop those skills more quickly and you will retain them for longer periods. Not find it lose it. Skill acquisition and training environments are essential in the development of every player.
In every aspect of your golf swing it is vital for the body to rotate forward toward the target rather than back and away.
To encourage better forward rotation move into your set up set up position lift your heel of back foot so that only the toe of you shoe is lightly touching the ground. With the same leg, turn your knee so that the knee cap is pointing more towards the target. You should now be set up almost in your finish position with your lower body. Swing normally. During the swing the heel of your back foot should not touch the ground at any point, especially in the finish position. This will help create the sensation of the weight staying in the more centred in the backswing and allow you to rotate forward without thinking too much as you are already half way there.
Hit 5-7 shots in this set up and then test your rotation forward and balance by hitting a shot in your standard set up. You are trying to recreate the awareness of rotating forward and keeping your weight more centred and eliminating any back and away weight shift.
Have some swings at half speed with your hands apart. Swing the club head more like a baseball, tee ball swing on the horizontal to start with then move down to a more regular swing. When you are comfortable with the sensation of the hands apart tee the ball up and hit some shots (half speed only). Rotate forward into a balanced finish always.
By splitting your grip so that your hands are not touching it will make you rotate forward more with your body so that your arms and body will work together and are more coordinated. Any arm swings, pulling of the grip or flicking the club head to lift the ball off the ground will result in your hands getting crossed up and the club head passing your body. You will start to find a way to turn your body as the sensation of an all arms or wrist swing is off putting. Where the club head hits the ground will be very inconsistent, until you start to turn more freely.
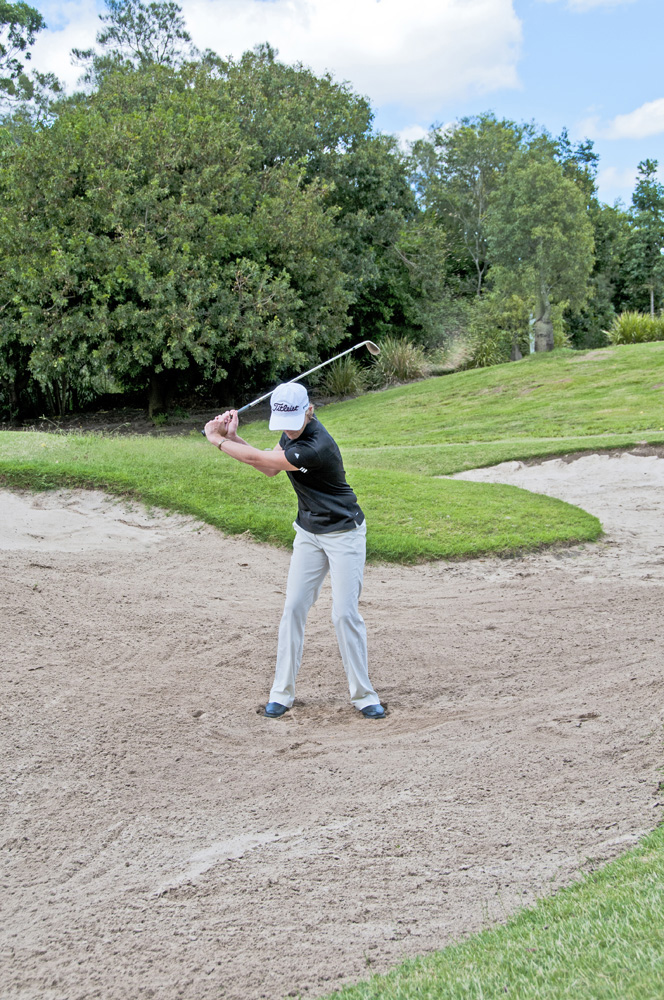
In the bunker, without a ball, set up into your set up position. Open the face of your club up until the face is nearly pointing to the sky or parallel to the ground. Scoop up some sand onto the club face. Continue Reading→